The Curriculum

The Curriculum

Introduction

208: Channel Categories and Names

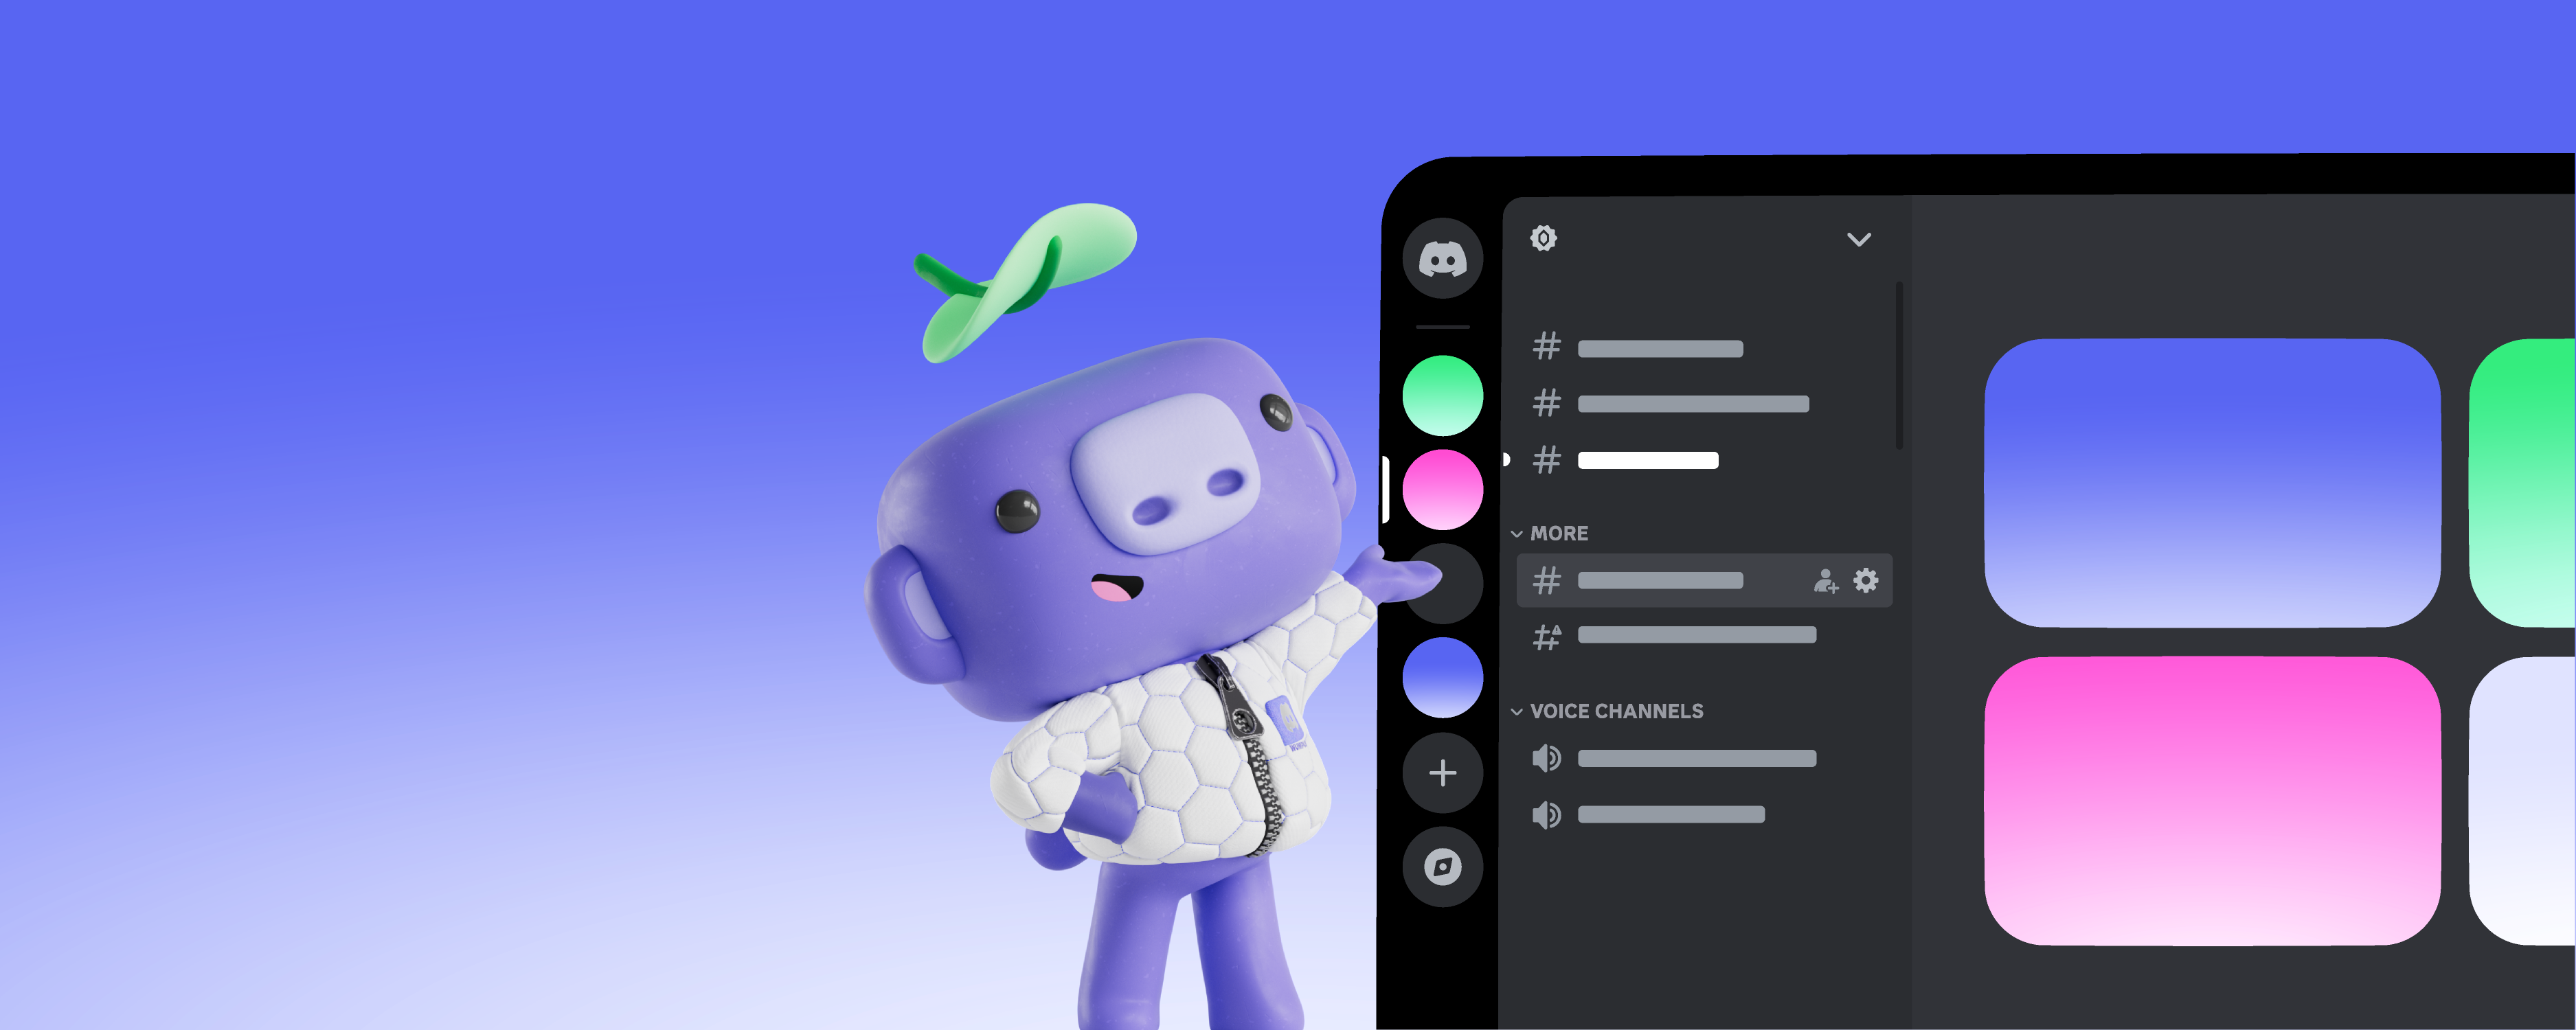
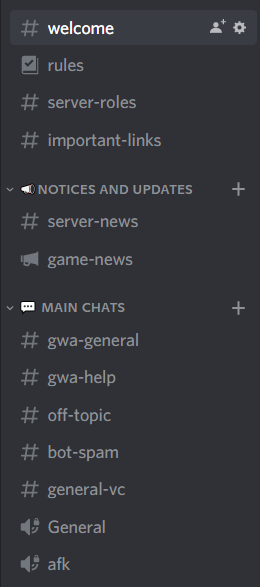
The first thing people will see when they join your server is your channel list. Therefore, it’s important that your channels are clearly named and organized so that new users can easily find necessary information and readily understand how they should use each channel without being overwhelmed. To accomplish this, you should try to have organized channel categories where channels have clear names and topics, with pinned messages supplementing channel topics as needed.


Organizing Channels

When it comes to the initial order of your channel list, it makes the most sense to put the most important channels at the top to give users the background information they need about the server, followed by the channels you expect users to spend the most time in for easy access. Generally speaking, this means your rules channel and informational channels about the server as a whole such as the welcome channel or resources channel will be at the top of your list, followed by your main chat channels and then your more niche channels at the bottom.

Your top-most channel is specifically important because this is the channel that your Vanity URL will point to (if you have one). For this reason, this should generally be a welcome or rules-related channel. Also note that in order for your Vanity URL to work at all, you must have at least one channel on your server that is visible to @everyone with no other roles.

To further simplify your channel list, you can also use channel categories. Organizing channels into categories creates natural breaks in the channel list, allowing members to quickly read through it and find the channel they need. Members can also collapse categories as well, further allowing each user to hone in on channels that are important to them. Members of your server, especially new ones, may find it confusing to navigate a long, unbroken list of channels. Channel categories will further help them find the appropriate channel for any conversation they want to have or information they need to find.

However, it’s important not to put too many channels into one category, as this will create another long, unbroken list of channels that becomes difficult to navigate at a glance. Although there are reasons for including many channels in one category, keeping the amount to around four or five is ideal. You can also consider picking two or three of your most important channels and not placing them in categories at all, which will automatically bring them to the top of the channel list and prevent them from being collapsed into a category accidentally.

An example of what a server with important channels outside of channel categories might look like.

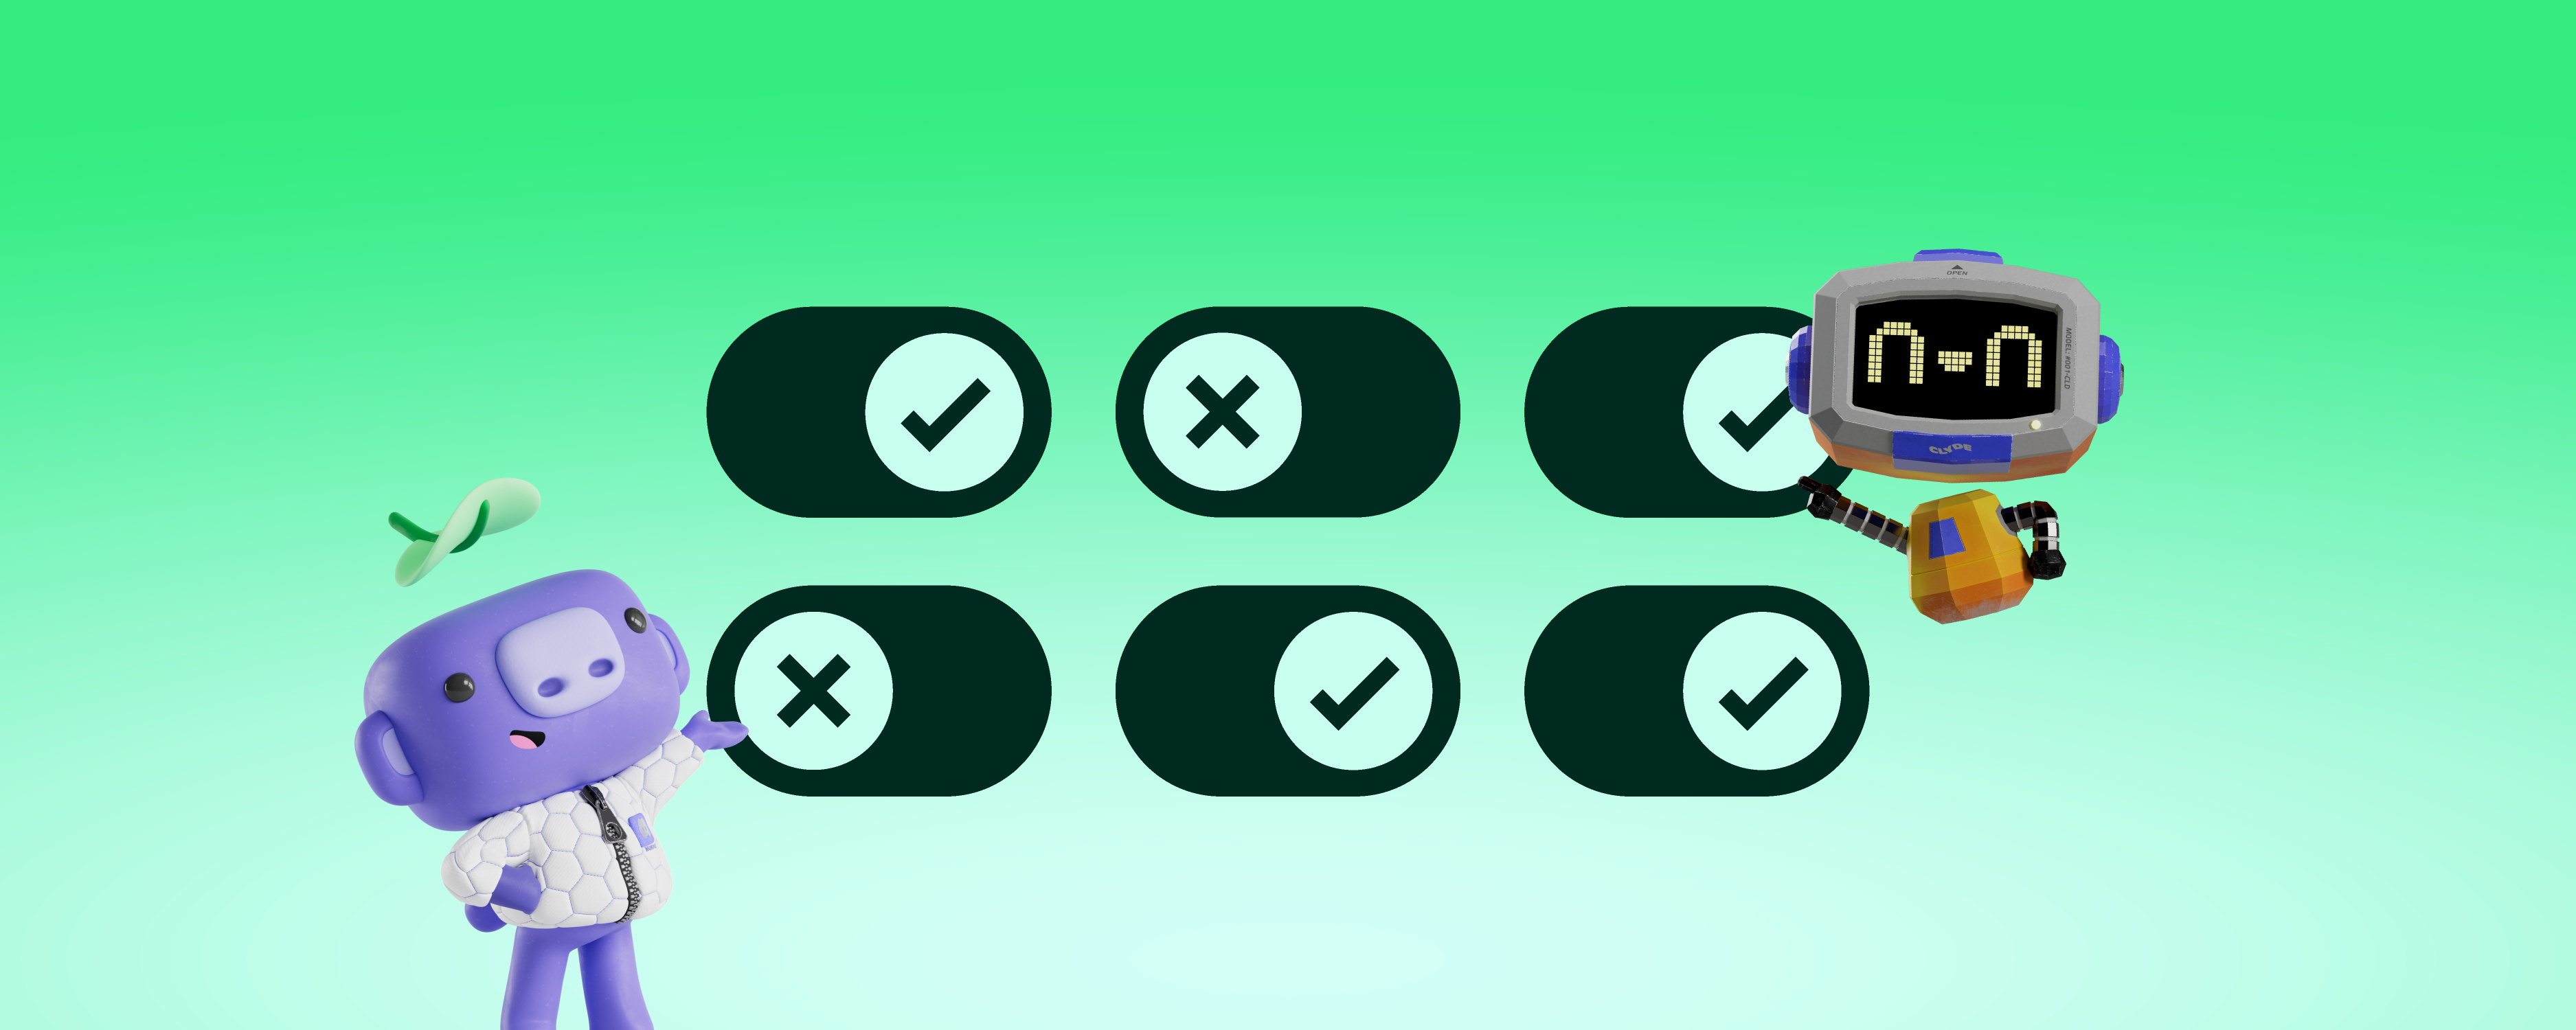
One more consideration for channel organization arises if you are utilizing variable channel lists. Simply put, this is any sort of system that allows people to change which channels they have access to. For example, if you implement a verification gate, you’ll need to consider what channels people should see before and after passing verification. You may also want to implement self-assignable roles through a Discord bot that allow people to opt in or opt out of viewing certain channel categories. Keeping the previous organizational tips in mind and using the View as Role tool will help you see what the server looks like before and after verification as well as with opt in or opt out channel roles and help you to organize them in a way that makes sense for your server.

Naming Channels

Once your channel list is easy to scroll through, the next step is making sure your channel and channel category names are easy to understand. Channel names can be as long as you want, but will be cut off after reaching approximately 25 characters, making them difficult to read. For example, the first channel below is just right, but the channel after is really extra super duper long and the full name isn’t displayed in the sidebar.

Channel names should ideally be unique in the server. Although nothing stops you from having multiple channels with the same name, creating identically named channels can make it easy to mention the wrong one in a message and confuse the reader. For example, if you have one category for On Topic channels and another category for Off Topic channels you could create a #on-topic-general and #off-topic-general respectively, rather than creating a #general channel in each category.

These are still kind of a mouthful, though. Another option could be to incorporate the topic of your server into these channel names. If your server is about Wumpus’s Grand Adventure, you could name your on-topic channel #wga-general and then simply name your off-topic general chat channel #off-topic.

Some people also like to add emojis to their channel names and categories. While this can be a good way to add some flair to your channel list, having too many emojis can detract from the names of the channels themselves. Furthermore, different devices render emojis differently, so what looks good on your own computer or phone may not look good on someone else’s device. Using emojis strategically to draw members’ eyes to important channels or using them only in category names instead of in every channel name may be better long-term. Similarly, you should also avoid using non-standard characters (e.g., 𝒻𝑜𝓃𝓉𝓈 ) when naming channels as this can make channel names difficult to read and mention.

There are many ways to go about it, but keeping your channel names concise, unique, and clear will go a long way towards making them easier for your members to read and understand their purpose at a glance. Some channels, however, may need additional explanation beyond simply their name and category.

Channel Topics and Pinned Messages

Channel topics and pinned messages are two ways to further explain the purpose of a channel, how to use it, and what channel-specific rules may apply.


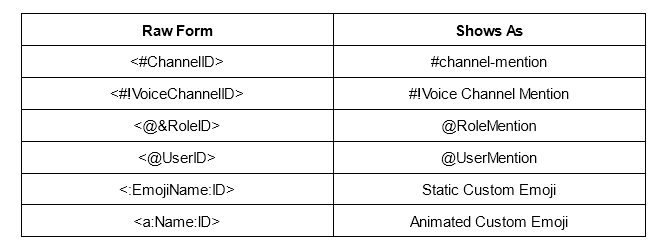
Channel topics appear next to the channel name on the desktop and web Discord clients and on the members list sidebar on mobile. Long channel topics can be expanded by clicking or tapping on the topic text and support basic markdown formatting. However, if you want to mention another channel, role, or user in a channel topic, you’ll need to type out the raw form of the mention in order for it to show up in the topic properly. These raw forms are as follows:

You can right click channels, roles, and users with Developer Mode enabled to copy the ID, and for emojis the ID will be the numbers at the end of the URL when you open the emoji in your browser. This will allow you to easily reference other entities as needed without needing to worry about the names of those channels, roles, or users changing in the future.

Although channel topics can be quite long, it’s important to remember that people will not want to read a wall of text about a channel. It is ideal for you to keep a topic down to one or two sentences long. However, depending on the purpose of the channel, explaining the proper usage and purpose can be difficult. If your channel topic starts to become paragraphs long or even hits the channel topic character limit, it may be better to simplify it and add “check the channel pins for more details” to the end. Pinned messages are more obscure than the channel topic when it comes to providing information about a channel, but have the advantage of giving you more space to explain the intricacies of the channel, use advanced formatting, and take advantage of link embeds and attachments.

Regardless of whether you use channel topics, channel pins, or both, including additional information about a channel beyond the category and name is an important part of ensuring everyone can understand the purpose of a channel and how it fits into the server.

Characteristic
Add Verified Role
Remove Unverified Role
Bypassing the server verification level
Users will be subject to the server verification level until they verify.
Users will not be subject to the server verification level on joining, but will be after they verify.
Role Permissions
The @everyone role should have no permissions, the Verified role should have the permissions you would normally give to @everyone.
The @everyone role should have normal permissions. The Unverified role should have no permissions.
Channel Permissions
Separate instructional & verification channels

@everyone role

✔ Read Messages in both channels

❌ Add Reactions in both channels
✔ Read Message History in instructional

❌ Send Messages in instructional

✔ Send Messages in verification
❌ Read Message History in verification

Verified role

❌ Read Messages in both channels

❌ Add Reactions in both channels

Combined channel
@everyone role

✔ Read Messages
✔ Read Message History

✔ Send Messages

❌ Add Reactions

Verified role

❌ Read Messages

❌ Add Reactions
Separate instructional & verification channels

@everyone role

✔ Read Messages in both channels

❌ Add Reactions in both channels
✔ Read Message History in instructional

❌ Send Messages in instructional

✔ Send Messages in verification
❌ Read Message History in verification

Verified role

❌ Read Messages in both channels

❌ Add Reactions in both channels

Combined channel
@everyone role

✔ Read Messages
✔ Read Message History*

✔ Send Messages

❌ Add Reactions

Verified role

❌ Read Messages

❌ Add Reactions

*Unless you are using the channel description for verification instructions rather than an automatic greeter message.

If you want to use the remove unverified role method, you will need a bot that can automatically assign a role to a user when they join.

Verification Actions
Once you decide whether you want to add or remove a role, you need to decide how you want that action to take place. Generally, this is done by typing a bot command in a channel, typing a bot command in a DM, or clicking on a reaction. The differences between these methods are shown below.

Characteristic
Interview
Click Reaction
Command in Channel
Command in DM
Ease of use
Requires the most effort from both moderators and users
Simple to perform, cannot mistype anything
More complex, users must read and type more carefully
Interaction with Server Verification Level
Users subject to server verification level (if using the Verified role method)
Users not subject to server verification level
Effectiveness
Extremely effective at deterring trolls from reaching the rest of the server
Users do not need to read instructions/rules as closely to understand what to do
Encourages users to read the verification message carefully
Encourages users to read the verification message carefully, but DM may not go through
Visibility
Moderators are directly involved
Moderators are unlikely to notice user action.
User action is visible to moderators
User action is not visible to moderators
Simplicity of setup
While the involvement of bots may be minimal, writing interview questions and determining evaluation criteria could be complex
Requires only a single #welcome type channel with instructions to click the reaction
Can require either only a single channel or two channels depending on preference
Does not require any channels, unless you want a backup verification method for users that have DMs disabled

In order to use the command in channel method, you will need to instruct your users to remove the Unverified role or to add the Verified role to themselves.

Conclusion

Remember that your channel list is more than a series of chat rooms. Each one should serve a purpose in your community and it’s vital that you clearly communicate what channels are available and how people should use them. Organizing them into clear categories, using easy to understand names, and including information in channel topics and/or pins are all ways to achieve this effective form of communication with your members. The quicker members understand your channels, the faster they can start participating in your community and the more likely they’ll be to stick around. Although every server’s situation is unique, these basic methods will serve as a good foundation to make your channels easy to understand and use for all of your members.

Element
Description
Title
The text that is placed above the description, usually highlighted. Also directs to a URL, if given.
Description
The part of the embed where most of the text is contained.
Content
The message content outside the embed.
URL
The link to the address of the webpage. Mostly used with the thumbnail, icon and author elements in order to link to an image.
Color
Color of your embed’s border, usually in hexadecimal or decimal.
Timestamp
Time that the embed was posted. Located next to the footer.
Footer
Text at the bottom of the embed.
Thumbnail
A medium-sized image in the top right corner of the embed.
Image
A large-sized image located below the “Description” element.
Author
Adds the author block to the embed, always located at the top of the embed.
Icon
An icon-sized image in the top left corner of the embed, next to the “Author” element. This is usually used to represent an Author icon.
Fields
Allows you to add multiple subtitles with additional content underneath them below the main “Title” & “Description” blocks.
Inline
Allows you to put multiple fields in the same row, rather than having one per row.

Markdown is also supported in an embed. Here is an image to showcase an example of these properties:

Example image to showcase the elements of an embed
An important thing to note is that embeds also have their limitations, which are set by the API. Here are some of the most important ones you need to know:

An important thing to note is that embeds also have their limitations, which are set by the API. Here are some of the most important ones you need to know:

  • Embed titles are limited to 256 characters
  • Embed descriptions are limited to 2048 characters
  • There can be up to 25 fields
  • The name of a field is limited to 256 characters and its value to 1024 characters
  • The footer text is limited to 2048 characters
  • The author name is limited to 256 characters
  • In addition, the sum of all characters in an embed structure must not exceed 6000 characters
  • A webhook can have 10 embeds per message
  • A webhook can only send 30 messages per minute

If you feel like experimenting even further you should take a look at the full list of limitations provided by Discord here.

It’s very important to keep in mind that when you are writing an embed, it should be in JSON format. Some bots even provide an embed visualizer within their dashboards. You can also use this embed visualizer tool which provides visualization for bot and webhook embeds.

Hypothesis
Chart/Table Affected
Expected Result
Removing invite links from less relevant traffic sources will decrease server growth.
  • How many new members are joining?
  • Total membership over time
  • Most popular invites/referrers
  • New members joining decreases
  • Total membership over time grows more slowly or decreases
  • Total joins from the invite link/referrer decreases
Adding or promoting an invite link on a relevant traffic source will increase server growth
  • How many new members are joining?
  • Total membership over time
  • Most popular invites/referrers
  • New members joining increases
  • Total membership over time increases more quickly or decreases more slowly
  • Total joins from the invite link/referrer increases
Improving the overall quality of referrers will attract people that are more likely to stay on your server and engage with your community
  • Server leaves over time
  • How many new members successfully activate on their first day?
  • Members remain on your server after joining, decreasing server leaves over time from new members
  • Members are more likely to want to engage with your server prior to joining, and will be more likely to talk or visit multiple channels
Webhooks
Bots
Function
  • Can only send messages to a set channel.
  • They can only send messages, not view any.
  • Can send up to 10 embeds per message.
  • Much more flexible as they can do more complex actions similar to what a regular user can do.
  • Bots are able to view and send messages.
  • Only one embed per message is allowed.
Customization
  • Can create 10 webhooks per server  with the ability to customize each avatar and name.
  • Able to hyperlink any text outside of an embed.
  • Public bots often have a preset avatar and name which cannot be modified by end users.
  • Cannot hyperlink any text in a normal message, must use an embed.
Load and security
  • Just an endpoint to send data to, no actual hosting is required.
  • No authentication that data sent to webhook is from a trusted source.
  • No authentication that data sent to webhook is from a trusted source.If webhook URL is leaked, only non-permanent problems may occur (e.g. spamming)
  • Easy to change webhook URL if needed.
  • Bots have to be hosted in a secure environment that will need to be kept online all the time, which costs more resources.
  • Bots are authenticated via a token, compromised token can cause severe damage due to their capabilities if they have permissions granted to them by the server owner.
  • However, you can reset the bot token if needed.

Even though this comparison is important for better understanding of both bots and webhooks, it does not mean you should limit yourself to only picking one or the other. Sometimes, bots and webhooks work their best when working together. It’s not uncommon for bots to use webhooks for logging purposes or to distinguish notable messages with a custom avatar and name for that message. Both tools are essential for a server to function properly and make for a powerful combination.

Spam Type
Mee6
Dyno
Giselle
Gaius
YAGPDB
Carl
Gearbot
Fast Messages
No
Yes
Yes****
Yes
Yes
Yes
No
Repeated Text
Yes
Yes
Yes****
Yes
Yes
No
No
Newline Text
No
No
Yes****
Yes
No
No
No
Mentions
Yes
Yes
Yes
Yes
Yes
Yes
Yes*
Links
Yes*
Yes*
Yes*
Yes
Yes***
Yes
Yes
Invites
Yes*
Yes*
Yes*
Yes
Yes
Yes
Yes
Images
No
Yes
Yes
Yes**
No
Yes
No
Emoji
Yes
Yes
No
Yes
No
No
No

*Unconfigurable filters, these will catch all instances of the trigger, regardless of whether they’re spammed or a single instance

**Gaius also offers an additional NSFW filter as well as standard image spam filtering

***YAGPDB offers link verification via google, anything flagged as unsafe can be removed

****Giselle combines Fast Messages and Repeated Text into one filter

Anti-Spam is integral to running a large private server, or a public server. Spam, by definition, is irrelevant or unsolicited messages. This covers a wide base of things on Discord, there are multiple types of spam a user can engage in. The common forms are listed in the table above. The most common forms of spam are also very typical of raids, those being Fast Messages and Repeated Text. The nature of spam can vary greatly but the vast majority of instances involve a user or users sending lots of messages with the same contents with the intent of disrupting your server.

There are subsets of this spam that many anti-spam filters will be able to catch. If any of the following: Mentions, Links, Invites, Emoji, and Newline Text are spammed repeatedly in one message or spammed repeatedly across several messages, they will provoke most Repeated Text and Fast Messages filters appropriately. Subset filters are still a good thing for your anti-spam filter to contain as you may wish to punish more or less harshly depending on the spam. Namely, Emoji and Links may warrant separate punishments. Spamming 10 links in a single message is inherently worse than having 10 emoji in a message.

Anti-spam will only act on these things contextually, usually in an X in Y fashion where if a user sends, for example, 10 links in 5 seconds, they will be punished to some degree. This could be 10 links in one message, or 1 link in 10 messages. In this respect, some anti-spam filters can act simultaneously as Fast Messages and Repeated Text filters.

Sometimes, spam may happen too quickly for a bot to catch up. There are rate limits in place to stop bots from harming servers that can prevent deletion of individual messages if those messages are being sent too quickly. This can often happen in raids. As such, Fast Messages filters should prevent offenders from sending messages; this can be done via a mute, kick or ban. If you want to protect your server from raids, please read on to the Anti-Raid section of this article.

Text Filters
Text filters allow you to control the types of words and/or links that people are allowed to put in your server. Different bots will provide various ways to filter these things, keeping your chat nice and clean.

FIlter
Mee6
Dyno
Giselle
Gaius
YAGPDB
Carl
Gearbot
Banned words
Yes
Yes
Yes
Yes
Yes
Yes
Yes
Whitelist
No
No
Yes
Yes
Yes
No
Yes
Templates
No
Yes
No
Yes
No
No
No
Immunity
Yes
Yes
Yes
Yes
Yes
Yes
Yes
Banned Links
Yes*
Yes*
No
Yes
Yes*
Yes***
Yes
Whitelist
Yes
No
No
Yes
Yes**
Yes***
Yes
Templates
No
No
No
Yes
Yes**
Yes***
No
InvitesNo
Yes
Yes
Yes
Yes
Yes
Yes
Yes
Extras
Zalgo
Selfbot
Regex
Regex
Files
No

*Defaults to banning ALL links

**YAGPDB offers link verification via google, anything flagged as unsafe can be removed

***Setting a catch-all filter with carl will prevent link-specific spam detection

A text filter is integral to a well moderated server. It’s strongly, strongly recommended you use a bot that can filter text based on a blacklist. A Banned words filter can catch links and invites provided http:// and https:// are added to the word blacklist (for all links) or specific full site URLs to block individual websites. In addition, discord.gg can be added to a blacklist to block ALL Discord invites.

A Banned Words filter is integral to running a public server, especially if it’s a Partnered, Community or Verified server, as this level of auto moderation is highly recommended for the server to adhere to the additional guidelines attached to it. Before configuring a filter, it’s a good idea to work out what is and isn’t ok to say in your server, regardless of context. For example, racial slurs are generally unacceptable in almost all servers, regardless of context. Banned word filters often won’t account for context, with an explicit blacklist. For this reason, it’s also important a robust filter also contains whitelisting options. For example, if you add the slur ‘nig’ to your filter and someone mentions the country Nigeria’ they could get in trouble for using an otherwise acceptable word.

Filter immunity may also be important to your server, as there may be individuals who need to discuss the use of banned words, namely members of a moderation team. There may also be channels that allow the usage of otherwise banned words. For example, a serious channel dedicated to discussion of real world issues may require discussions about slurs or other demeaning language, in this exception channel based Immunity is integral to allowing those conversations.

Link filtering is important to servers where sharing links in ‘general’ chats isn’t allowed, or where there are specific channels for sharing such things. This can allow a server to remove links with an appropriate reprimand without treating a transgression with the same severity as they would a user sending a racial slur.

Whitelisting/Blacklisting and templates for links are also a good idea to have. While many servers will use catch-all filters to make sure links stay in specific channels, some links will always be malicious. As such, being able to filter specific links is a good feature, with preset filters (Like the google filter provided by YAGPDB) coming in very handy for protecting your user base without intricate setup however, it is recommended you do configure a custom filter to ensure specific slurs, words etc. that break the rules of your server, aren’t being said.

Invite filtering is equally important in large or public servers where users will attempt to raid, scam or otherwise assault your server with links with the intention of manipulating your user base to join or where unsolicited self-promotion is potentially fruitful. Filtering allows these invites to be recognized, and dealt with more harshly. Some bots may also allow by-server white/blacklisting allowing you to control which servers are ok to share invites to, and which aren’t. A good example of invite filtering usage would be something like a partners channel, where invites to other, closely linked, servers are shared. These servers should be added to an invite whitelist to prevent their deletion.

Anti-Raid
Raids, as defined earlier in this article, are mass-joins of users (often selfbots) with the intent of damaging your server. There are a few methods available to you in order for you to protect your community from this behavior. One method involves gating your server with verification appropriately, as discussed in DMA 301.You can also supplement or supplant the need for verification by using a bot that can detect and/or prevent damage from raids.

Mee6
Dyno
Giselle
Gaius
YAGPDB
Carl
Gearbot
Raid detection
No
No
Yes
No*
No
No
No
Raid prevention
No
No
Yes
Yes
No
No
No
Raid-user detection
No
No
Yes
Yes
No
No
No
Damage prevention
No
Yes
No
Yes*
No
Yes
No
Templates
No
No
No
Yes
Yes**
Yes***
No
Raid anti-spam
No
Yes
Yes
Yes
Yes
No
No
Raid Cleanup
No
Yes
Yes
Yes
Yes
Yes
Yes

*Unconfigurable, triggers raid prevention based on user joins & damage prevention based on humanly impossible user activity. Will not automatically trigger on the free version of the bot.

Raid detection means a bot can detect the large number of users joining that’s typical of a raid, usually in an X in Y format. This feature is usually chained with Raid Prevention or Damage Prevention to prevent the detected raid from being effective, wherein raiding users will typically spam channels with unsavoury messages.

Raid-user detection is a system designed to detect users who are likely to be participating in a raid independently of the quantity of frequency of new user joins. These systems typically look for users that were created recently or have no profile picture, among other triggers depending on how elaborate the system is.

Raid prevention stops a raid from happening, either by Raid detection or Raid-user detection. These countermeasures stop participants of a raid specifically from harming your server by preventing raiding users from accessing your server in the first place, such as through kicks, bans, or mutes of the users that triggered the detection.

Damage prevention stops raiding users from causing any disruption via spam to your server by closing off certain aspects of it either from all new users, or from everyone. These functions usually prevent messages from being sent or read in public channels that new users will have access to. This differs from Raid Prevention as it doesn’t specifically target or remove new users on the server.

Raid anti-spam is an anti spam system robust enough to prevent raiding users’ messages from disrupting channels via the typical spam found in a raid. For an anti-spam system to fit this dynamic, it should be able to prevent Fast Messages and Repeated Text. This is a subset of Damage Prevention.

Raid cleanup commands are typically mass-message removal commands to clean up channels affected by spam as part of a raid, often aliased to ‘Purge’ or ‘Prune’.It should be noted that Discord features built-in raid and user bot detection, which is rather effective at preventing raids as or before they happen. If you are logging member joins and leaves, you can infer that Discord has taken action against shady accounts if the time difference between the join and the leave times is extremely small (such as between 0-5 seconds). However, you shouldn’t rely solely on these systems if you run a large or public server.

User Filters
Messages aren’t the only way potential evildoers can present unsavoury content to your server. They can also manipulate their Discord username or Nickname to cause trouble. There are a few different ways a username can be abusive and different bots offer different filters to prevent this.

Filter
Mee6
Dyno
Giselle
Gaius
YAGPDB
Carl
Gearbot
Bad words
No
No
No
Yes*
Yes
No
No
Spam
No
No
No
Yes*
Yes**
No
No
Hoisting
No
No
No
Yes*
Yes**
No
No

*Gaius can apply same blacklist/whitelist to names as messages or only filter based on items in the blacklist tagged %name

**YAGPDB can use configured word-list filters OR a regex filter

Username filtering is less important than other forms of auto moderation, when choosing which bot(s) to use for your auto moderation needs, this should typically be considered last, since users with unsavory usernames can just be nicknamed in order to hide their actual username.

Hypothesis
Chart/Table Affected
Expected Result
Enabling or adjusting the Welcome Screen will guide users to the right introduction channels and encourage engagement
Welcome Screen
  • All metrics
Growth & Activation
  • How many new members successfully activate on their first day? - % visited more than 3 channels
  • Users click on each channel in equal proportion and send messages in equal proportion afterwards
  • % visited more than 3 channels will increaseFirst day activation increases
Streamlining the channel and role structure will make the server less overwhelming to new users and encourage participatio

nand/or

Greeting people upon joining the server in a general chat channel will encourage them to respond and participate in the community
Growth & Activation
  • How many new members successfully activate on their first day?
Engagement
  • How many members visited and communicated?
  • Message activity
  • Which text/voice channels do people use the most?
  • % talked (voice or text) will increase
  • % communicators will increase
  • Message activity will increase
  • Channels that are made opt in, require privileged access, or moved to the bottom of the channel list will have less engagement than other channels
  • The channel with greet messages will have an increased number of readers and, if send messages is enabled, a greater number of messages and chatters
Implementing a news feed announcement channels with role notifications will encourage people to check the announcement channel regularly
Growth & Activation
  • How many new members retain the next week?
Engagement
  • Which text/voice channels do people use the most?
  • Members retained will increase
  • Readers on the announcement channel will increase
Implementing community engagement campaigns will improve activity
The measurement and expected results of each community engagement campaign will vary based on the exact nature of the campaign. However, you can expect that they will improve some combination of first day activation, user retention, and/or percent communicators within your server.

One additional component not included in the table is the effects of implementing a verification gate. The ramifications of a verification gate are difficult to quantify and not easily summarized. Verification gates make it harder for people to join in the conversation of your server, but in exchange help protect your community from trolls, spam bots, those unable to read your server’s language, or other low intent users. This can make administration and moderation of your server much easier. You’ll also see that the percent of people that visit more than 3 channels increases as they explore the server and follow verification instructions, and that percent talked may increase if people need to type a verification command.

However, in exchange you can expect to see server leaves increase. In addition, total engagement on your other channels may grow at a slower pace. User retention will decrease as well. Furthermore, this will complicate the interpretation of your welcome screen metrics, as the welcome screen will need to be used to help people primarily follow the verification process as opposed to visiting many channels in your server. There is also no guarantee that people who send a message after clicking to read the verification instructions successfully verified. In order to measure the efficacy of your verification system, you may need to use a custom solution to measure the proportion of people that pass or fail verification.

Ready to test your moderator skills?

Take the Discord Moderator Exam!

Take the Exam