


Hey there! I’m Grace, and I founded Design Buddies: an inclusive community on Discord for anyone interested in design. Full-time, I’m a Product Designer in the games industry and I love all things design.
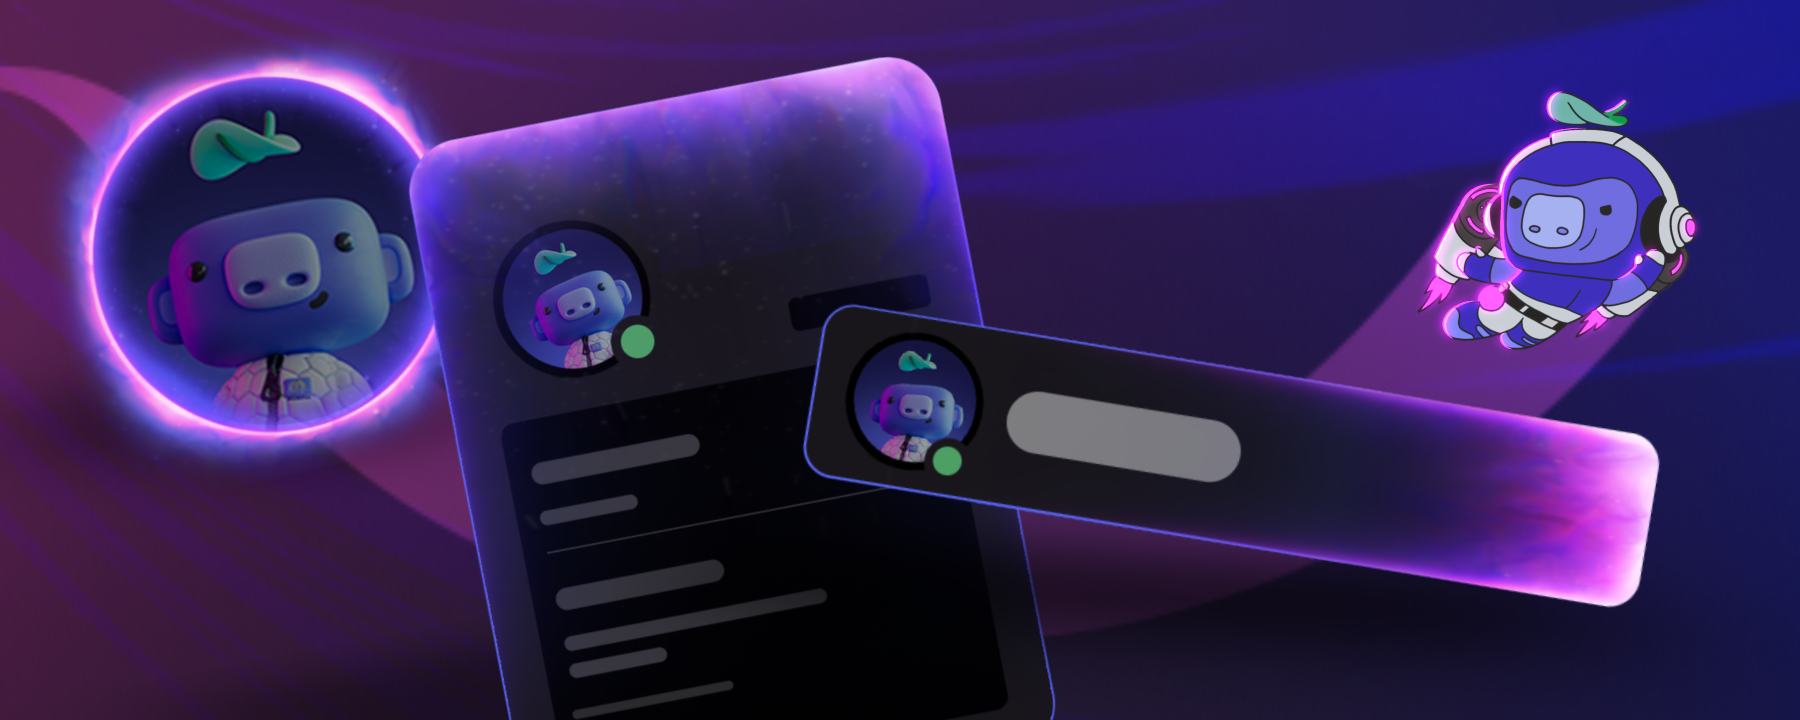
Today, we’d like to share some design tips with everyone on Discord, on a place that anyone can use: your profile! How do you make people feel when you show up? What do people say when you leave the room? That’s your personal brand. Your personal brand can be linked to your online persona.
Personal branding can be more beneficial than you’d think — below, we’ve got guidance for those just getting started, along with more expert guidance for creators. Whether you’re a gamer, artist, fan, or anything in between, there are multiple places on Discord where you can customize your appearance—including your avatar, banner, and bio—in a way that represents who you truly are.
We’ll be sharing some examples and walking you through the process of how we designed an avatar, banner, and bio set. You’ll come away with practical tips on how to help make your own Discord profile stand out in style.
Let’s dive in!
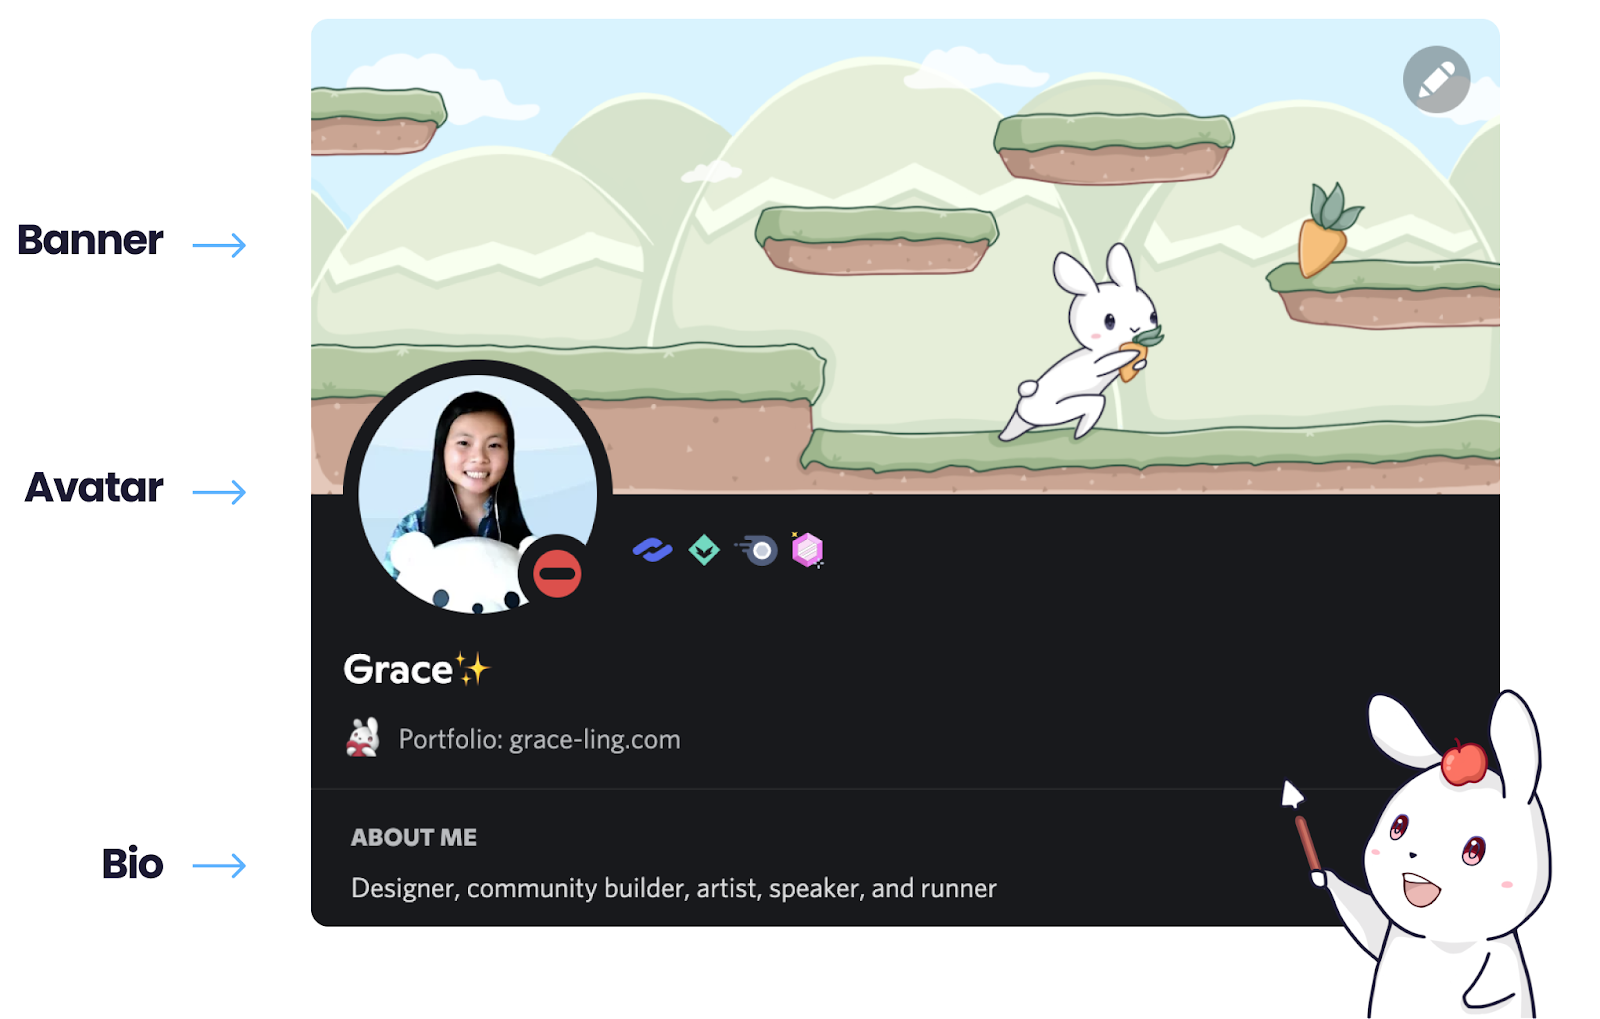
Your Profile Avatar
Your avatar is shown in your servers, the conversations you have with your friends, and when you’re in a Voice call. On Discord, you aren’t limited to how others may perceive you — your presence on the platform is whatever you make of it, and in turn, who you truly are. Choose imagery that represents the real you, whatever that may be!
Some pointers on uploading the best avatar: while you may use a square photo, it’ll be cropped to a circle when displayed on Discord. When uploading, it's best to use a simple image or GIF (file formats JPG, PNG, or GIF) that’s around 200x200 pixels at minimum, and under 10 MB. There are plenty of tools available to create your avatar with — Photoshop, Procreate, Figma, Spline, Blender, your own camera, and plenty more!
Now let’s hop into designing!
First, Brainstorm Your Idea!
- What things do you like? What inspires you?
- What colors best represent you? Or, what’s your favorite color?
- What do you do on Discord? What kind of communities are you in and what are your roles there, if any?
- How would you like your banner to look along with your avatar? Is there a common theme you’d like to carry across the two of them?
- What imagery would you like to use to bring out your themes?
If it helps, you may also create a moodboard to help you think of your theme and imagery. Lay everything out and listen to what jumps out at you!
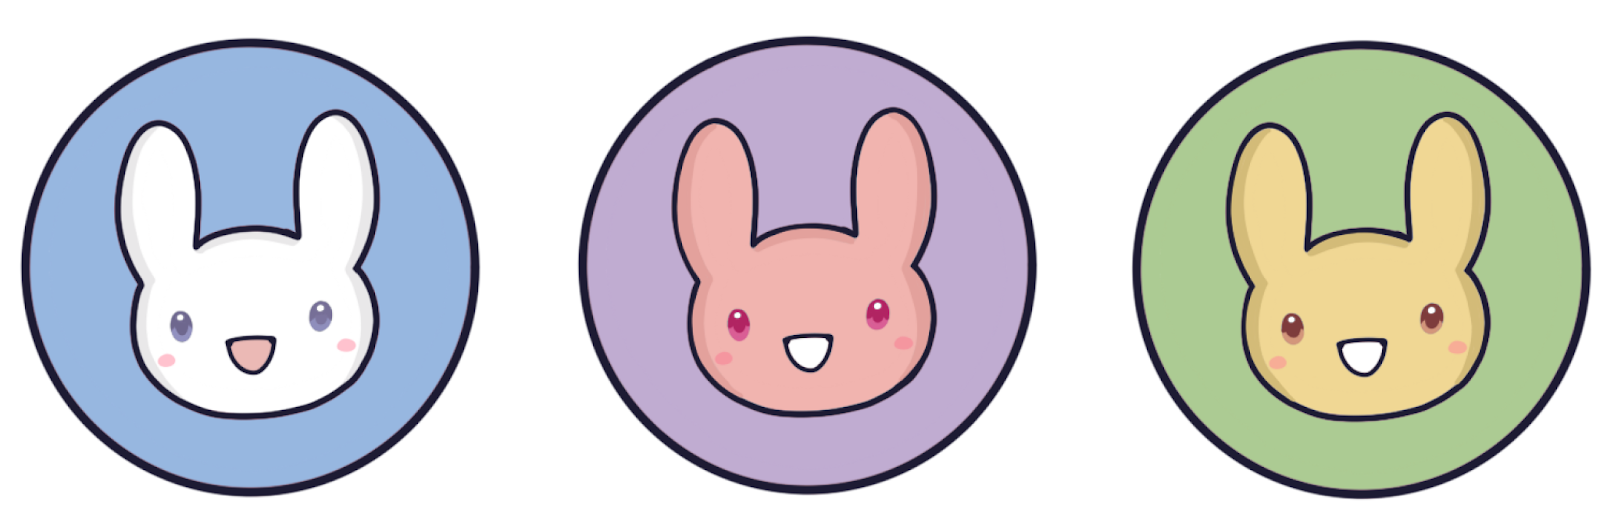
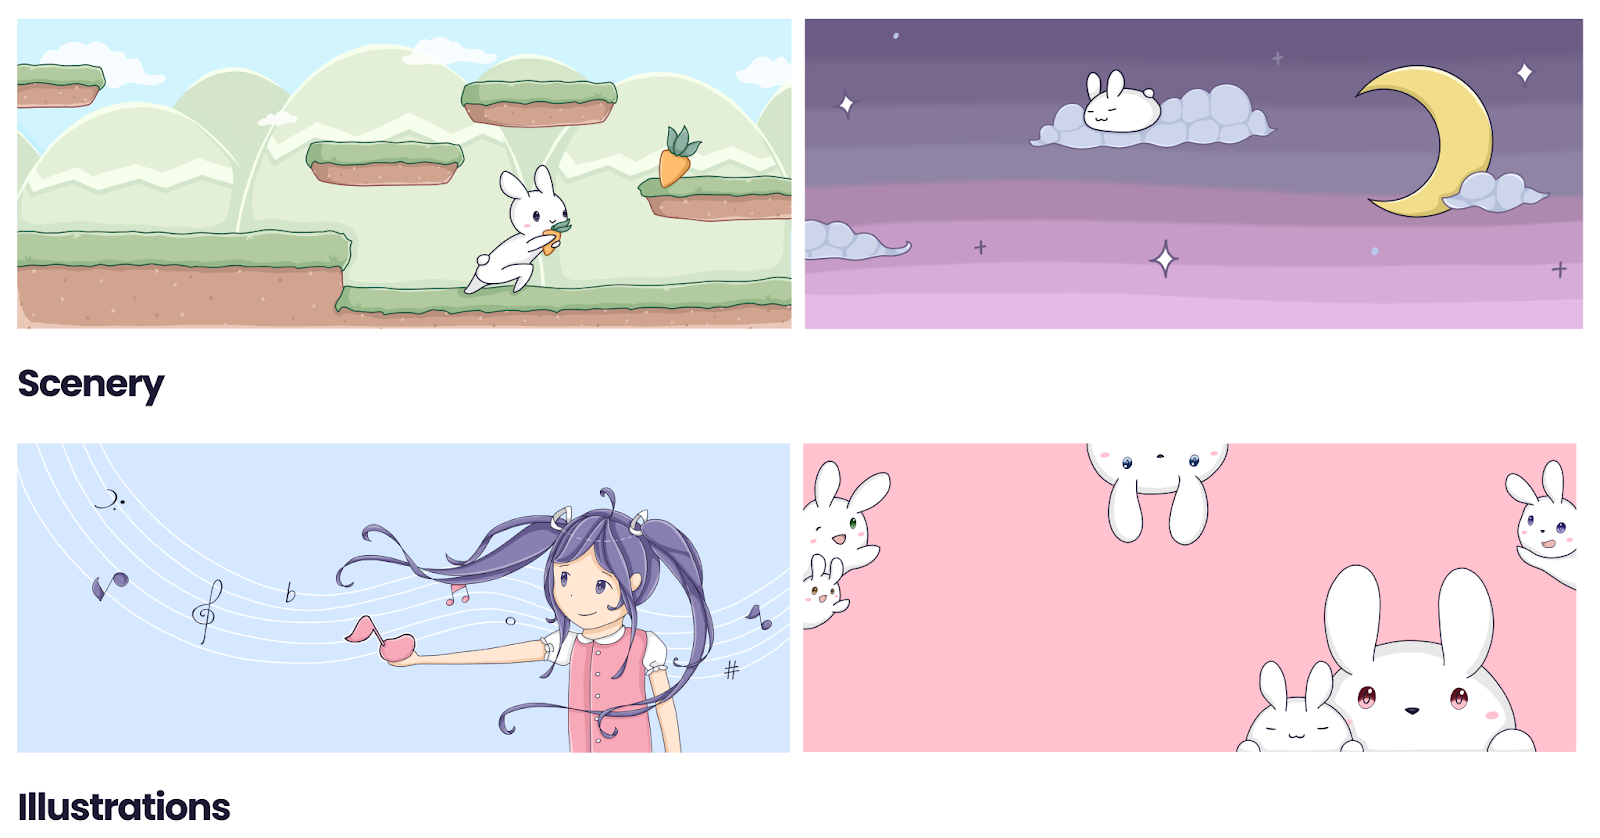
Here are some ideas of different ways to lay out your avatar (but not limited to this):
Imagery is the visual language that helps others recognize you. They tell a story of who you are, so tell them what you want!
Then, Sketch and outline!
Once you decide on a design, you can start to draw! In this example, we're using the Procreate app for iPad, but there’s similar features in other digital painting software. Use what you’re most comfortable with! This example is featuring one of the goodies we will be sharing towards the end of the blog post — stay tuned to the end for a surprise! :)

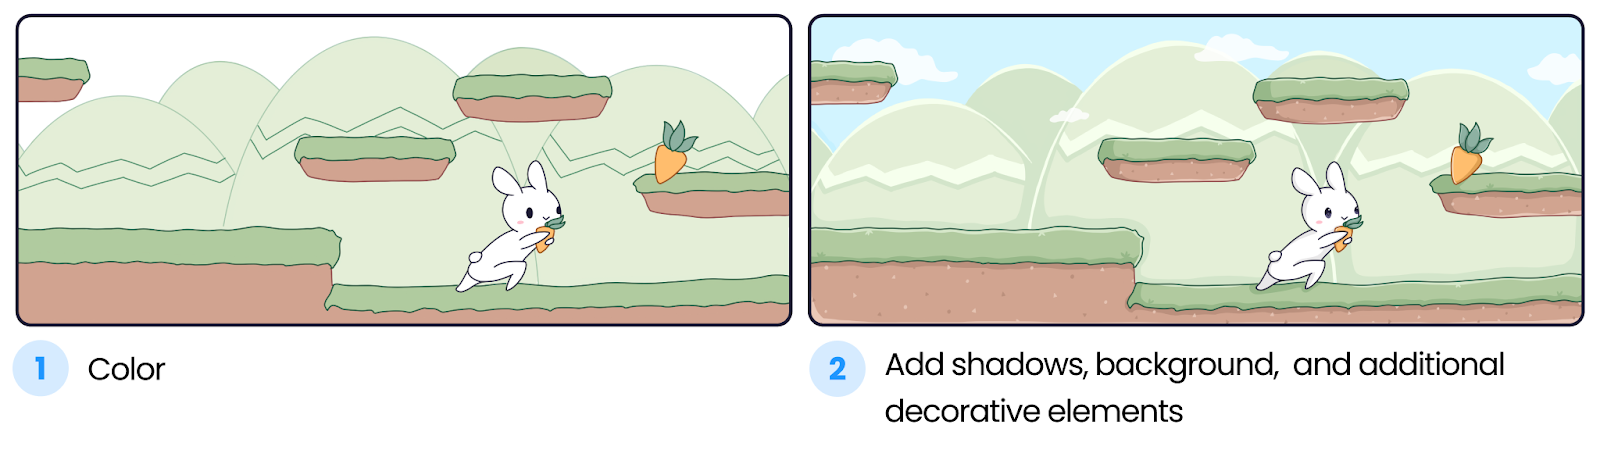
Similar to our avatar, we start by drawing basic shapes of all of the main objects for the foundation — the game platforms, bunny, carrot, and mountains in the background. For characters, you can also draw the joints of what position their body will be in, shown in step 1.
Next, in step 2, we can lower the opacity of the first layer to around 30% and then add the main sketches of our objects in another layer. In these first 2 layers, we are using Procreate’s 6B pencil brush.
To finish off our outline, we can draw over our sketch to make the final outline like in step 3. using the technical brush.
Now, we're ready to color!
Finally, Get It Colored!
Color is one of the first things people notice when they look at your profile and shows your overall aesthetic. Do you want to bring a cool or warm vibe? Is your aesthetic pastel or monochromatic? Utilizing color effectively can bring your vibe to life and let others understand immediately what emotions or messages they should be feeling.
In our same example from above, here are the steps we took to color the avatar:
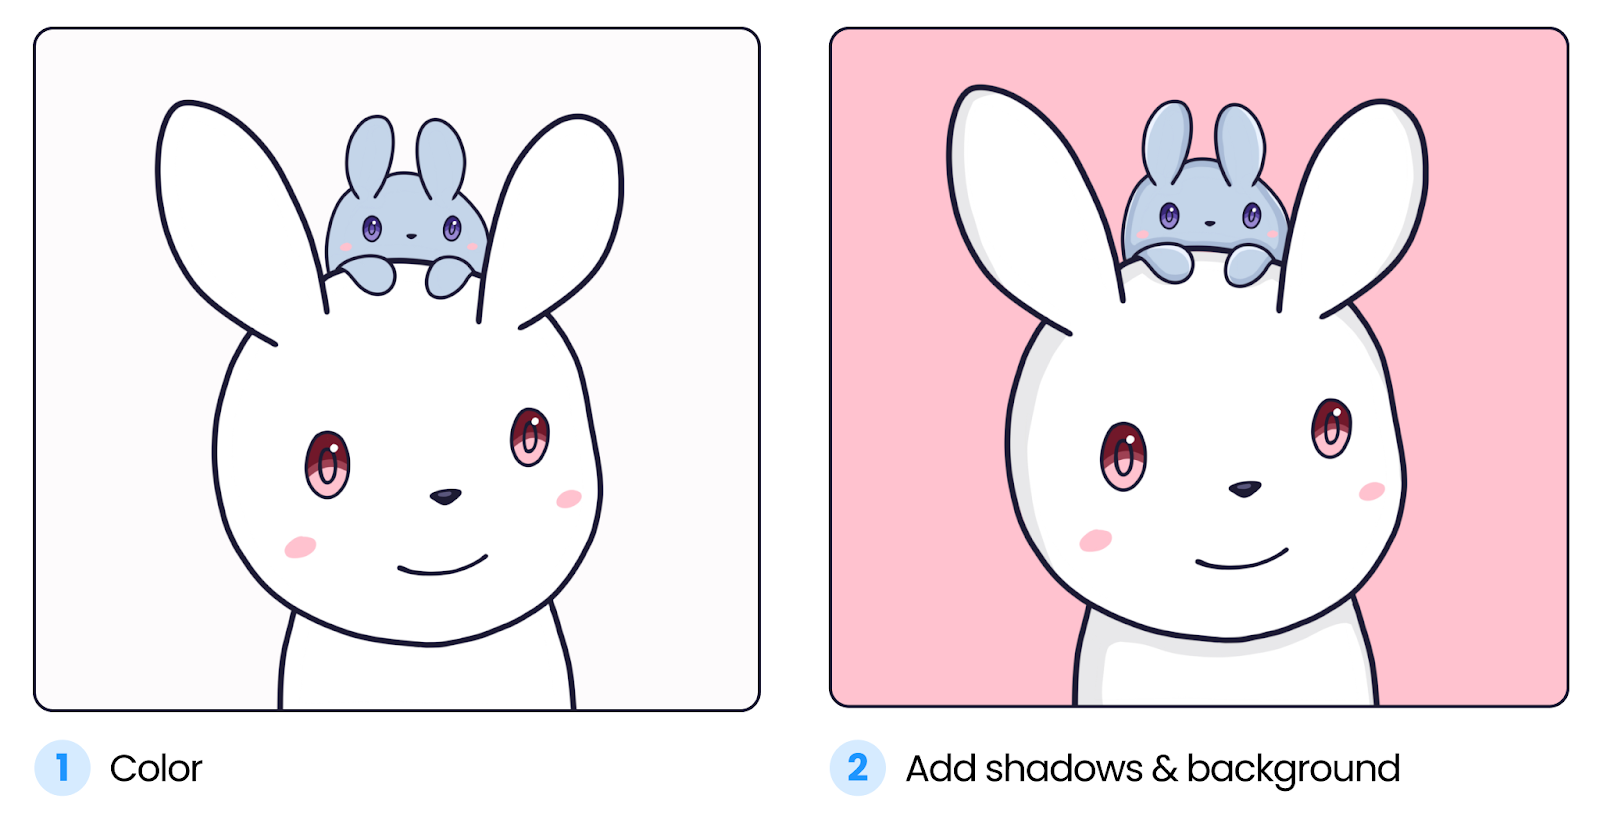
Make sure that the color layers are separate from your sketch and outline layers. Here, we start with a flat color to get the main colors down using the outline as a guide, as shown in Step 1. Then, we add some subtle shadows in a cel-shading style to get to Step 2. Here, we are using the Round brush. When shading, be sure to create a new layer on top of your color layer and turn on a clipping mask to stay within the intended coloring area.
You can additionally add depth to your color by utilizing flat cel-shading, blending, perspective, visual effects, and more. In all of our examples, you can also use any brush you wish to achieve different visual styles— there’s no right or wrong answers!
Optionally, Add a Frame
Adding a frame to your avatar can help spice up your avatar for any sort of special occasion! You could even share the frame you make with members of your community and be twinsies. (or triosies, quadsies or more… sies!)

You can even use an animated avatar or select your favorite GIF! Some tools you can use to animate are After Effects, Blender, and Procreate. Fun fact: when you speak on either a Voice call or on a Stage channel, your avatar will animate in a loop. You can even make it look like you’re talking!
Also, if there’s a GIF on the internet that you absolutely resonate with, you can even set it as your avatar the same way you update your avatar!
Your Profile Banner
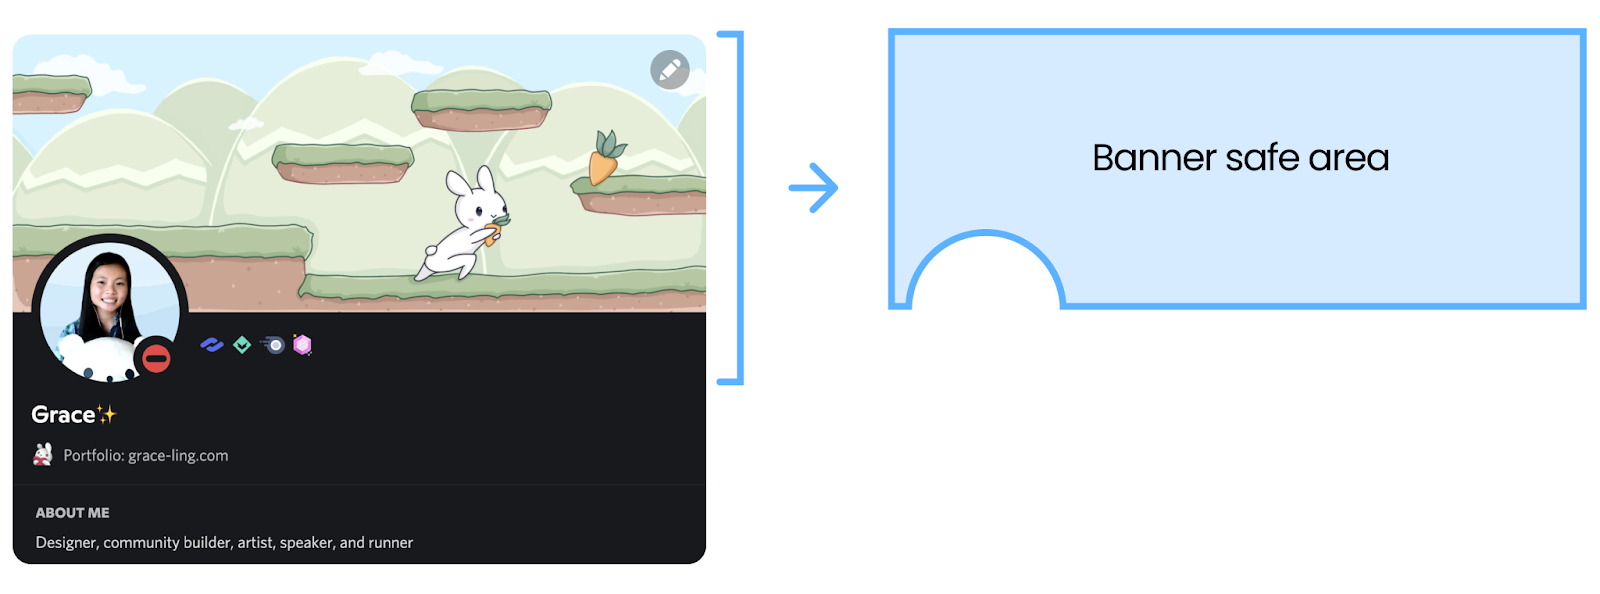
Your banner lives behind your avatar and is shown to anyone who clicks on your profile. When uploading a banner, you’ll need an image of at least 600x240 px as a PNG, JPG, or animated GIF under 10 MB. Even without Discord Nitro, you can also edit your banner color to match, or contrast with, your avatar.
When displayed, parts of your banner will be hidden by your avatar. Be aware of the area where it’s hidden by your avatar:
Brainstorm Your Banner!
- Do you want your banner to look similar to your avatar?
- What themes and would you like on your banner?
- What imagery could you use to bring out those themes?
Here are some different ways you can lay out your banner (but not limited to this):
Sketch Your Banner
Once you decide on a design, now it’s time to sketch it. Like last time, we’re using Procreate here, but you’re welcome to use whatever you’re most comfortable with.

Similar to our avatar, we start by drawing basic shapes of all of the main objects for the foundation — the game platforms, bunny, carrot, and mountains in the background. For characters, you can also draw the joints of what position their body will be in, shown in example 1.
Next, in example 2, we can lower the opacity of the first layer to around 30% and then add the main sketches of our objects in another layer.In these first 2 layers, we are using Procreate’s 6B pencil brush.
To finish off our outline, we can draw over our sketch to make the final outline like example 3. using the technical brush.
Now, we're ready to color!
Finally, Color Your Banner
Color will be one of the first things someone notices when they click into your profile. It’s a great, eye-catching tool to emphasize your overall vibe and aesthetic. As with everything about expressing yourself, your banner colors could match or be completely different from your avatar.

In our same example from above, here are the steps we took to color:
When adding color, make sure to create separate layers to avoid mixing colors when they are not supposed to be mixed. Make sure all coloring layers are separate from your outline layers. Also, sometimes it helps to create a thumbnail (laying out how all your colors will work, then zooming out to see how it looks) to see how all of your colors will look like all together first before coloring. Thumbnails are also good for more detailed and larger artwork.
You may start with the larger areas first, then smaller. Here, we start by adding just color with a round brush. After that, we add more details - shadows, glows, effects (eg. the patterns on the dirt patched), and even clouds! There are no right or wrong approaches here to coloring and visual effects. You may experiment with different colors and visual styles to bring out different moods, convey a different message, and more!
Optionally, Add a Frame
You could create frames for your avatars to additionally spice it up! You could even share frames with members of your community and twin with others.

Your Bio
Your bio is a space where you can input any text in 190 characters. It’s shown when someone clicks on your name anywhere across Discord.
You can use this space to briefly describe yourself, include your social media links, add some fun facts/inspirational quotes, memes, emojis that describe you, or anything else that you would want!
Ask yourself: What do you sound like? Playful, serious, or funny? Then you can have this tone in your bio!
Here are some examples of bios:
- Descriptive & short about who you are: “Designer, community builder, artist, speaker, and runner”
- Fact about yourself: “I have 3 dogs named Snowball, Goldie, and Teddy”
- Meme or song: “What does the fox say?”
- Phrase: “YOLO”
- Emojis: “🐰🎨🎮☕”
Putting it all together
You can set your avatar, banner, and bio in your user profile settings! Here are some examples. If you have Nitro, then you may also have a different avatar and profile banner in each server you’re in!
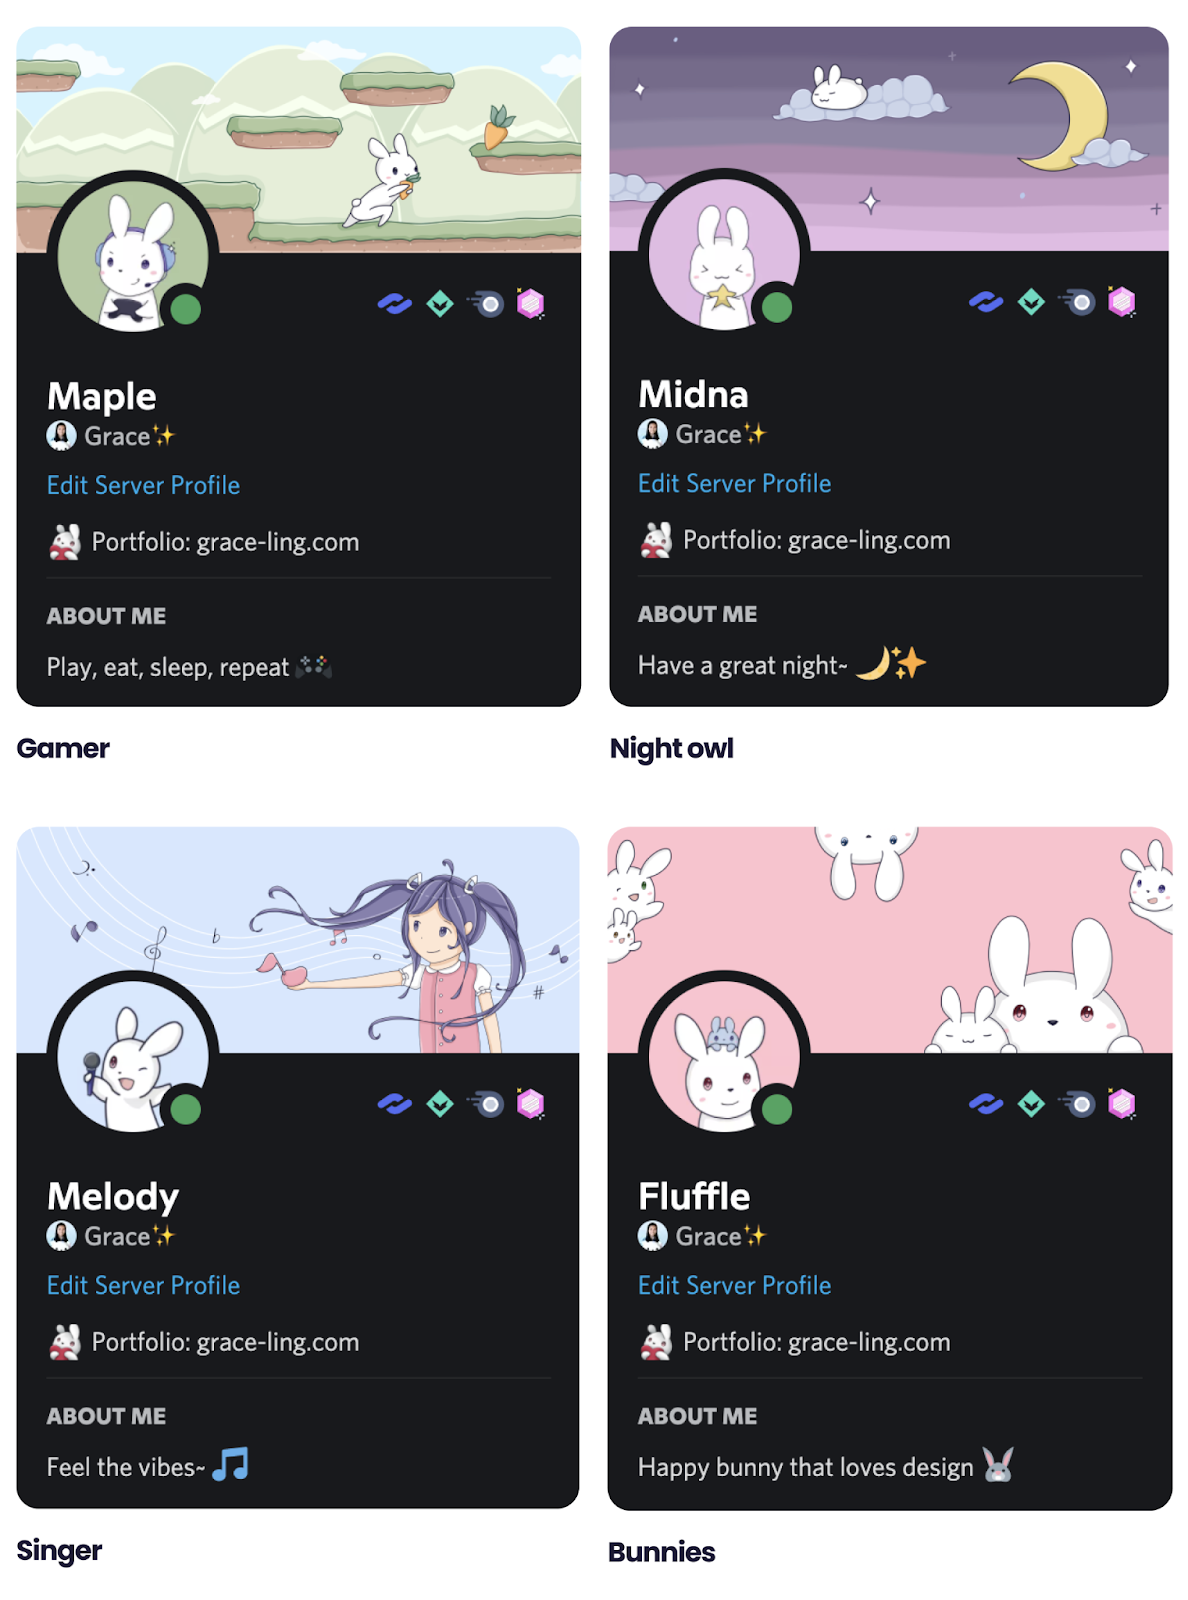
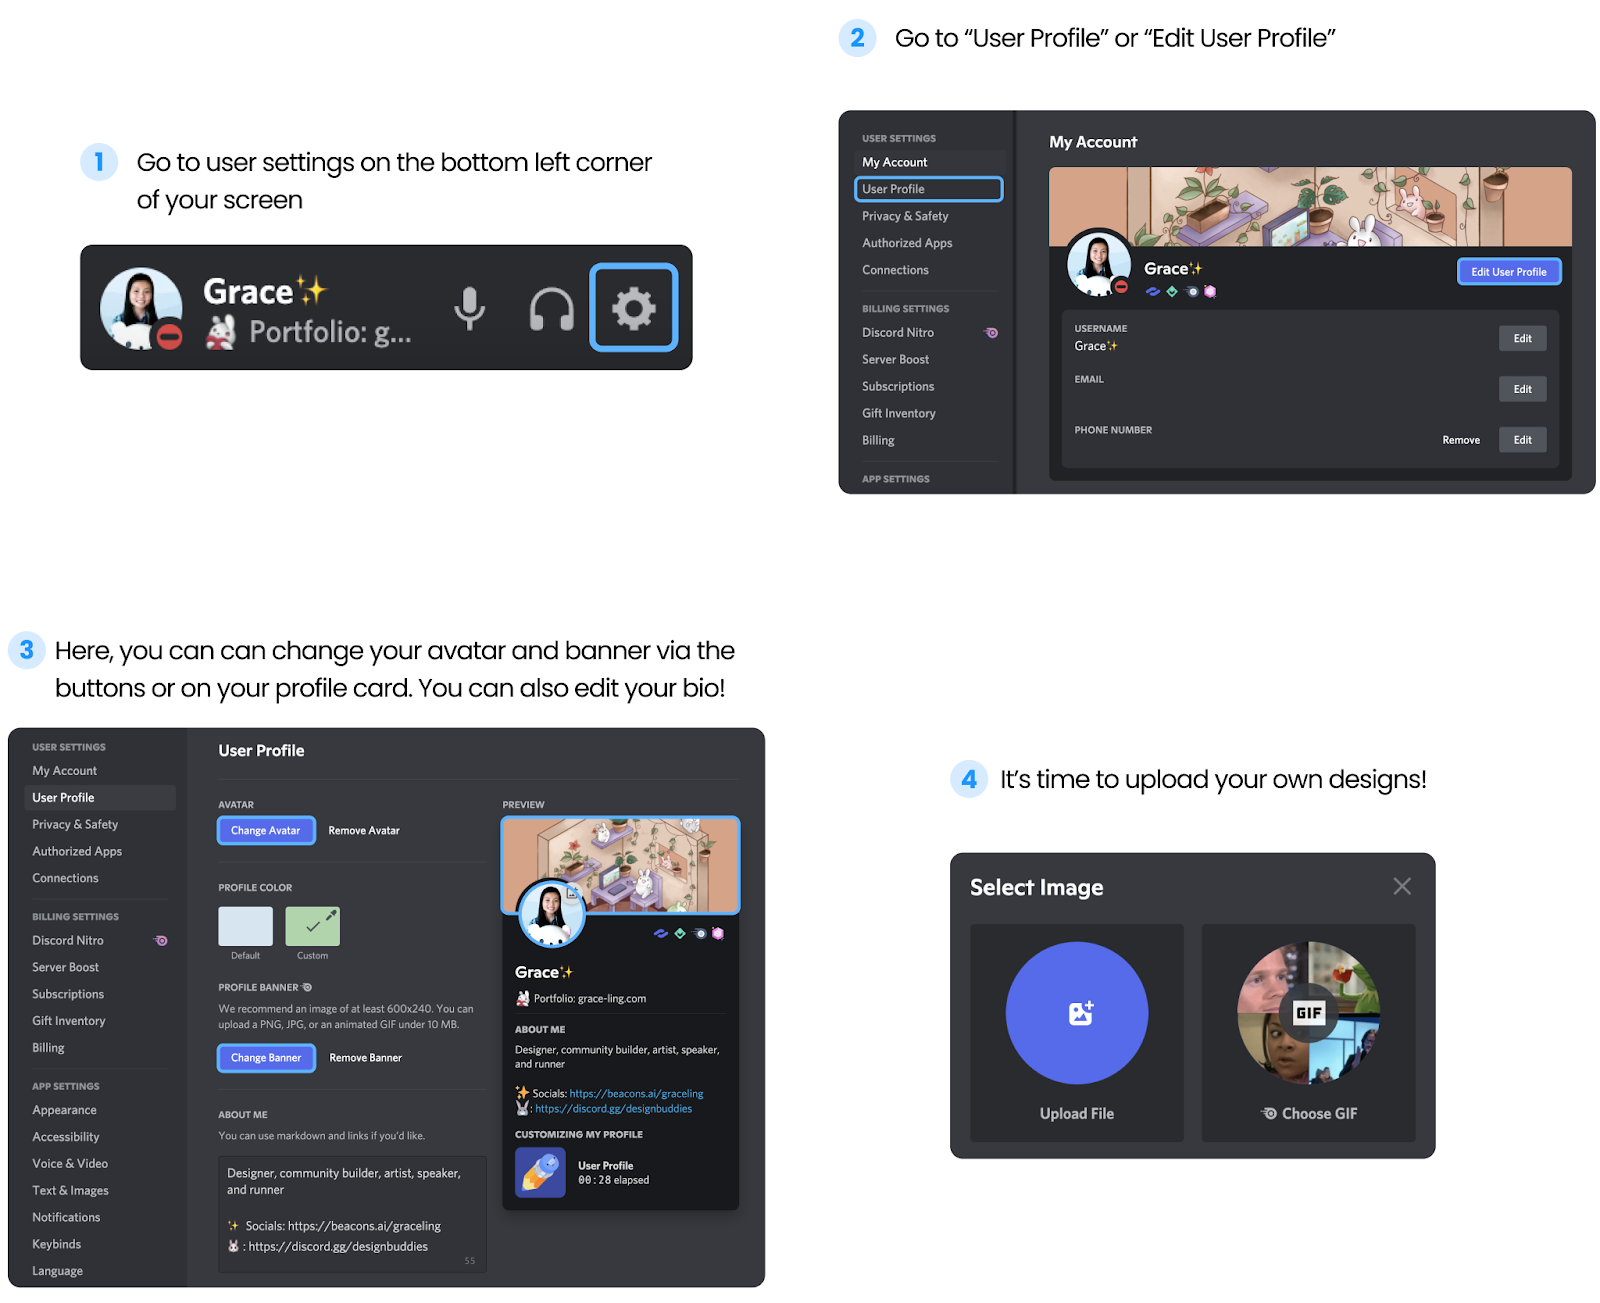
Also, here’s how you can edit your avatar, banner, and bio on Discord:
Note: If your file sizes are too large for your banner when you upload one, you may use tools such as Adobe’s image resizer to shrink them.
You may also choose a GIF from the internet as your avatar and banner!
Visuals & Tone: The Fundamentals of Profile Design
There are many elements you can use to describe yourself - colors, imagery, tone of voice, and more. We’ll break them down and connect them to your Discord profile!
Color
Color is one of the first things people notice when they look at your profile and show your overall aesthetic. Within the professional art community, color symbolism is how different hues of color help perceive meaning in life driven by the viewer’s cultural associations and personal experiences.
For example, red represents good luck in China but it means morning in South Africa. Red is also associated with passion, energy, and danger. It’s important to keep your audience in mind when you’re choosing colors.
Each color also has a different hue, shade, tint, and tone that affect its perception. For example, neon colors have different meanings than pastel colors.
Combining multiple colors can also enhance or take away from your message from your design. Color theory explains the relationship between colors using art and science.

Imagery
Imagery is the visual language and aesthetic appearance that helps others recognize you. They can help tell your story and communicate your message beyond color. Imagery could be your own art or photos in the case for your profile.
Tone of voice
What do you sound like? Playful, formal, or funny? Your tone of voice is how you and your brand communicate with the audience. It influences how people perceive your message. It helps build connection, trust, and memorability.
Your tone of voice can be reflected through your bio, username, and the way you communicate with others online. You can reference our bios section of this blog post for some examples.
Lastly, there is no right or wrong way to approach your online identity and personal brand. It’s uniquely you. You and your online identity, and personal brand are all a constantly evolving process! Don’t be afraid to try new things, grow, and change.
Designer-Made Profile Updates, for Everyone
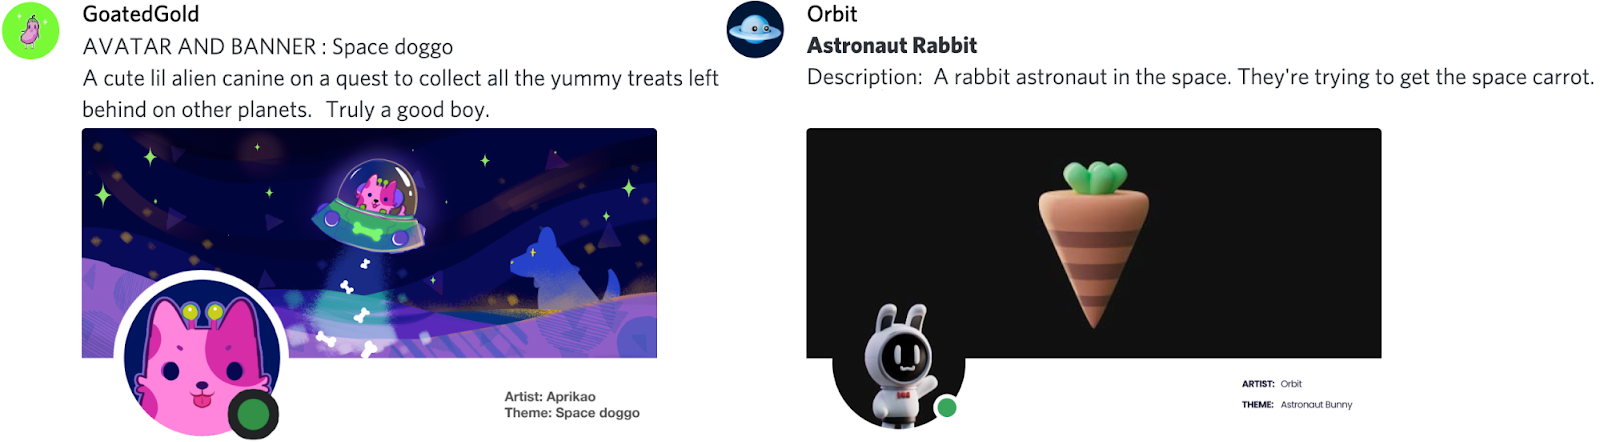
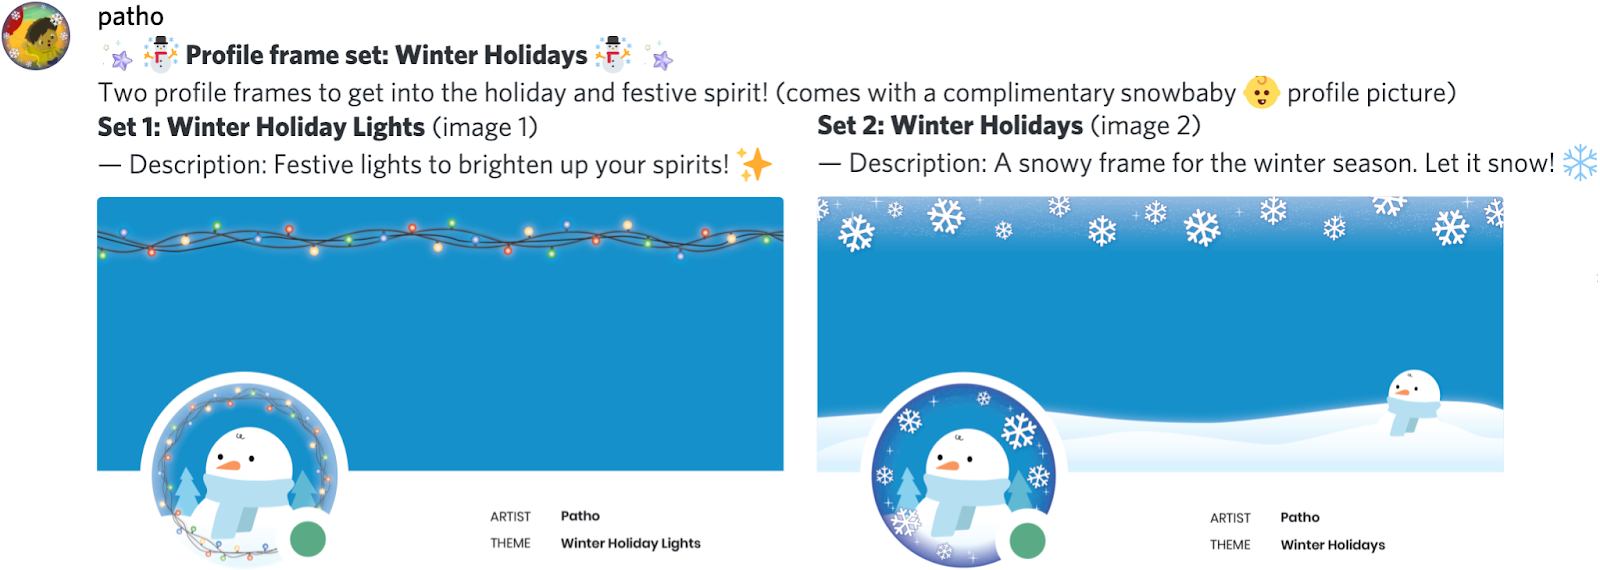
Before we go, the Design Buddies community has a gift we’d like to share. Our community has come together to create gorgeous sets of profile avatars, banners, and frames, free for anyone to use!
Check them all out below — if you see one you like, you can download it below the preview.


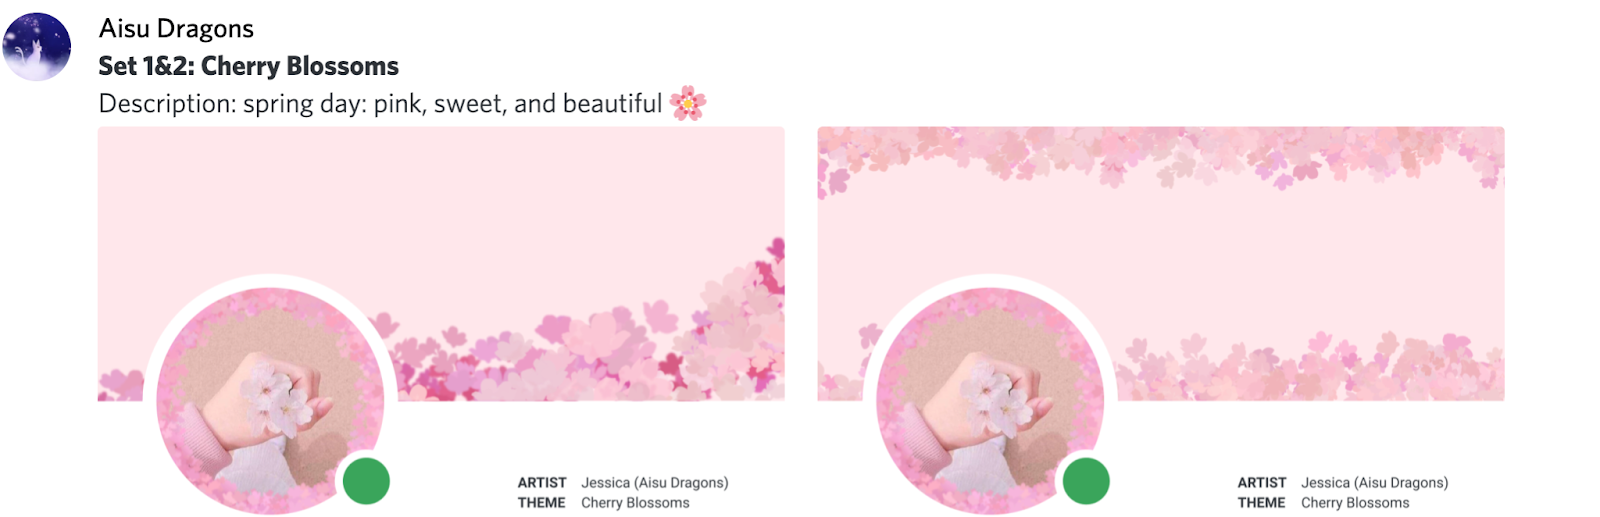
- Download: Cherry Blossoms Frame Ver. 1, by Aisu Dragons
- Download: Cherry Blossoms Frame Ver. 2, by Aisu Dragons
If this insight into the design process inspired you to pursue the design field further, we’d love to have you — join us at discord.gg/designbuddies and learn more about us at designbuddies.community. If any creatives would like to connect, you’re also welcome to reach out via my art Instagram!
We hope to see you soon,
Grace Ling


.png)
.png)


Nameplates_BlogBanner_AB_FINAL_V1.png)

_Blog_Banner_Static_Final_1800x720.png)


_MKT_01_Blog%20Banner_Full.jpg)


.png)


